Primitive Burlap Black Cat
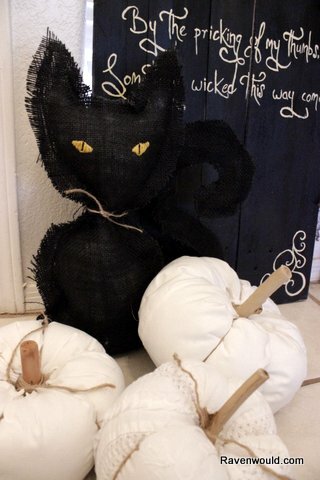
Are black cats out of style for Halloween? I never see many decorations with black cats in the stores at Halloween or maybe I’m just not looking for them. To remedy that I made a primitive burlap black cat that is spooky and cute at the same time if that is possible.
To make the kitty:
- Half a yard of black burlap
- Black thread
- Embroidery thread your choice of color for its eyes
- Small embroidery hoop
- Wire cut to one inch longer than the tail
- A piece of cord for tying around the neck
- Stuffing
- Plastic pellets
- Chopstick or something to stabilize it sitting up

I only drew half of the cat shape on the burlap. To make each side of the cat symmetrical I folded it in half. I also used the middle fold of the fabric for the bottom of the cat which will be filled with the pellets to give it some weight and a base to sit on.


I cut about a half inch larger than my outline for a seam allowance and because I wanted to keep the material rough. Instead of sewing and turning the fabric I am leaving the seams on the outside.

After cutting out the cat I sketched on some eyes with chalk and set up my embroidery hoop and my floss to make the eyes.

Keeping the back and front pieces pinned together I put the hoop on the front piece and worked carefully so as not to sew the back with it. I split the floss in half using only three strands.


Using the satin stitch to make the eyes, I left a small slit in the middle for the pupil. The satin stitch is just parallel stitches right next to each other.


I did the same with the other eye and tried to line them up as evenly as possible.

Now for a tail. I cut the tail into the shape I wanted it to be.

I used 20 gauge wire cutting it and shaping it to follow the tail. Make sure it is longer than the tail because it will be stuck into the body of the cat.
Before threading the wire through the tail, sew the tail together.

I had to curl the end of the wire with a pair of round nose pliers to push it through the tail. It would have been a real pain if I hadn’t.

Using the zig zag stitch on my machine, I sewed up one side of the cat leaving the flat part at the top of its head open for stuffing. Then I pinned the tail between the front and back pieces on the other side. Be careful when you sew the tail in because the wire is there also and you could break your needle if it hits the wire. I watched carefully and made sure not to run over it with the machine.

Again I stopped at the flat part of the head for the stuffing.

Now to fill the cat up with pellets and stuffing. I probably used about two cups worth of pellets and not much stuffing. I also stuck a chopstick in the back of it to keep its head from falling over. The tail is not stuffed at all. I sewed the top of its head together and tied on a piece of cording. To keep the tail up I tacked it to the back of its head with a bit of thread. Lastly, don’t forget to pull some of the stray threads of the burlap to make it look fuzzy.


If sewing isn’t your thing this would be easy to use liquid stitch or iron on hem tape to put the pieces together. Also instead of embroidering the eyes, they could be painted by adding textile medium to the paint.
I love this little kitty, it is cute but the eyes give it a spooky look. From start to finish it took me about an hour and a half to make. It is a quick afternoon project. I think I’ll make another one just a bit smaller.


I will be linking up with these parties.

(Visited 244 times, 1 visits today)


I say black cats for Halloween are in! At least since you made this cute one, and the fact I use my black cat Sir Brunswick to pose with my Halloween decor! Thanks for the tutorial, this is perfect for anyone’s halloween decor.
Thank you, Renee! Black cats are adorable and so is the name Sir Brunswick. I say they are in also!
He’s great. I typically do a witch theme for my front porch. This little guy is a great addition. Pinned. Thanks for creating this.
We love black cats! This is a cool burlap craft. I love how you used the satin for the eyes! #HomeMattersParty
Thank you, Nicole!
Hi, Killeen! That is soooo cool! It’s like an awesome piece of folk art. I just love it, thanks for the beautiful inspiration!
This is so fun and creative!! What a great craft.
Thanks for sharing at #bloggerspotlight
I love this project! I didn’t do any Halloween decorating this year, but if I did I would totally make one of these. Thanks for sharing our tutorial on Merry Monday. Pinned.
Thank you, Erlene! Have a great week!
This is so cute! Bookmarking for later 🙂 It’s great for an intermediate sewer, especially kids.
Thank you, Kerry! It would be a good project for kids with some sewing experience. 🙂
You are so talented and creative! Pinned and shared.
I love black cats for Halloween. Made a clay head today that I will add to an orange and black tin when it dries and after I paint it. I also picked up a primitive one at Hobby Lobby. Usually their Halloween is too cutesy for me, so I was surprised when I walked by it. I had to bring him home! 🙂 Love your burlap cutie! Thanks for sharing with SYC.
hugs,
Jann
II think that turned out really cute! I love the black cat. We have a real-life black kitty. She might get jealous if we made it!